Avoid Twitter JPG Compression By HD PNG To Improve Upload Quality
<a href="https://www.freegaminglogo.com/p/twitter-jpg-compression-image-quality.html" target="_blank"><img alt="Avoid Twitter JPG Compression By HD PNG To Improve Upload Quality " src="https://blogger.googleusercontent.com/img/b/R29vZ2xl/AVvXsEjT1HJyRWLkjGx9Gwb3kepVVuTcNNJyHZi728vMqMlsCmwcbB48ui7L6XiX2lPrT0g1aG8JPw0OqjGFSa4SOJeY-WKBcbuKo0otfl-oKC4GY2TIfNpAemtaxoc8DhdtQlNyQ-63mA46oHc/s1000/Infographics-Avoid-Twitter-JPG-Compression-By-HD-PNG-To-Improve-Upload-Quality.png" title="Avoid Twitter JPG Compression By HD PNG To Improve Upload Quality " /></a>
Tons of complaints on Twitter upload quality...
From time to time, you'll see so many people complaining about the poor image quality on Twitter when they upload their designs, photos, images, pictures to their timeline. The reason behind is that Twitter uploader applies very heavy compression on the images, especially JPG to conserve their server resources. When you try to view the uploaded image on Twitter timeline, the quality is sub-par or even blurry. It is more obvious for designs, photos and images with lots of effects and textures. However, we are now going to show you the secret tricks to force Twitter to retain the image quality as high definition / high resolution as possible. No more restraint. No more complaint. Read on to know more.

Basics
Before getting straight to the tips and tricks to upload maximum quality images on Twitter, you may be interested in the rationale and how we come up with this almost fool-proof method to ensure it works. The following is our observation and experiment findings when we try to look into the Twitter image upload process.
- Twitter image uploader accepts file formats in JPG, PNG and GIF.
- After being uploaded, JPG is the most compressed, while PNG is the least.
- The maximum dimension for an uploaded PNG is 2048 x 2048.
- A 100% opacity PNG will be converted to JPG and undergo heavy compression.
- PNG with too large file size may be converted to JPG, or cause internal server error when uploaded.
The Magical Recipe to upload HD images on Twitter
You may have heard about different ways to upload high resolution images on Twitter before, or even have tried them but in vain. Here comes the most well-organized steps to disclose the secrets behind Twitter's upload process and how you can achieve the best quality of the images, photos, designs and pictures you upload to your Twitter timeline. Success is guaranteed, only if you understand and follow the following tips and tricks carefully. While some steps are demonstrated through the use of Photoshop, other software can more or less achieve the same effect. We cannot promise whether Twitter will change its image upload mechanism and patch it. But it's quite unlikely as Twitter needs to continuously support PNG as an image upload format. So, let's get started.
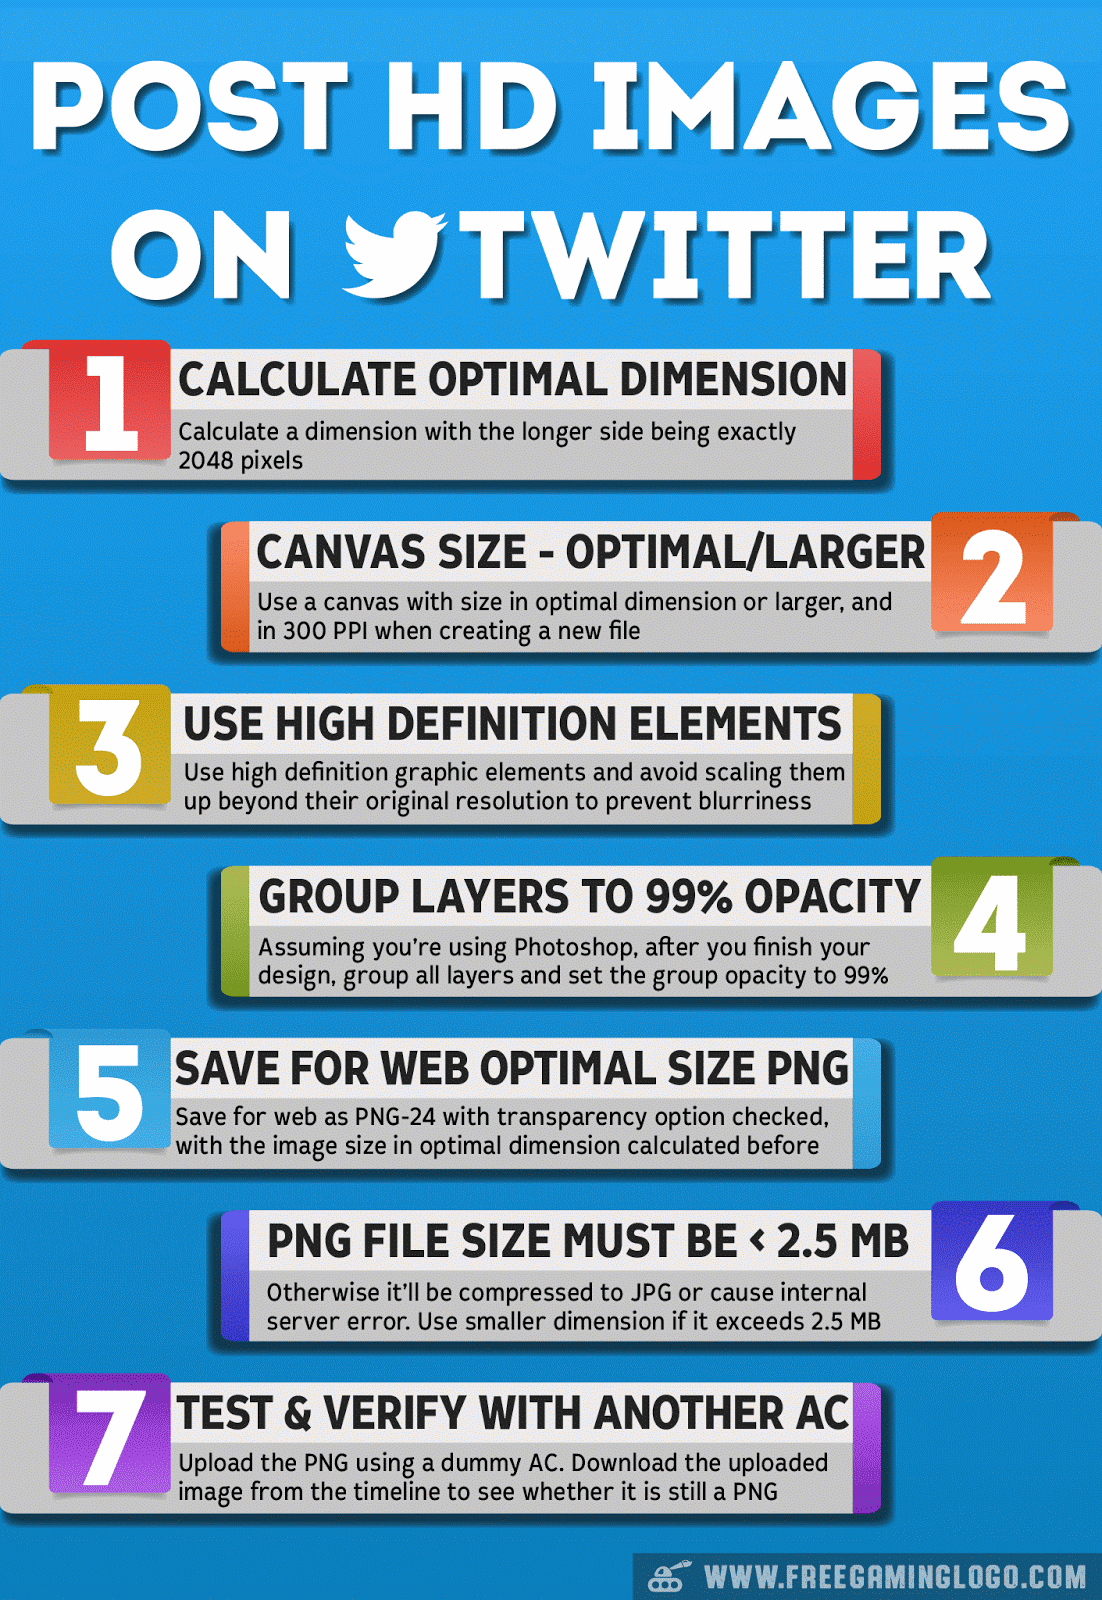
1. Calculate the optimal dimension
Let's get a calculator, be it a real one or an app, to do some real maths! We can assure you that this step is crucial to prevent any failures for all the secret tricks. By "optimal dimension", we mean that a dimension with the longer side being exactly 2048 pixels, but NOT falling behind or exceeding it. We'll show it through some examples here.
- For hardcore mathematicians (just joking, high school maths here!): Assuming you have ratio length (L) : width (W), the optimal dimension can be calculated by length = 2048 & width = 2048 ÷ L x W (landscape) or length = 2048 ÷ W x L & width = 2048 (portrait) For example, if you want a 1 : 1 square AVI design uploaded to your Twitter timeline, then the length is 2048 and width is 2048, so the overall dimension is 2048 x 2048. Another example, if you want a 3 : 1 header design uploaded, then the length is 2048, and width is 2048 ÷ 3 x 1 = 682 (rounded down to integer), so the overall dimension is 2048 x 682. How about a portrait digital photo of 3456 x 4608? The optimal dimension for upload would be: length is 2048 ÷ 4608 x 3456 = 1536, and width is 2048, so the overall dimension is 1536 x 2048.
- For people who don't care about any troublesome maths: Just make sure the longer side of the dimension you choose is exactly 2048 pixel, while the other side can be of any value.
- Examples of acceptable optimal dimensions: 2048 x 1024, 2048 x 800, 2048 x 1600, 800 x 2048, 1000 x 2048, 2048 x 2048 ...
- Examples of unacceptable dimensions (too large!): 2048 x 2600, 2048 x 3000, 1000 x 3000, 3872 x 2592, 6016 x 4000, 2500 x 2500 ...
- Examples of acceptable yet sub-par dimensions (too small!): 800 x 400, 500 x 500, 1000x 400, 600 x 300, 704 x 480, 640 x 480 ...
2. Use canvas size in optimal dimension or larger
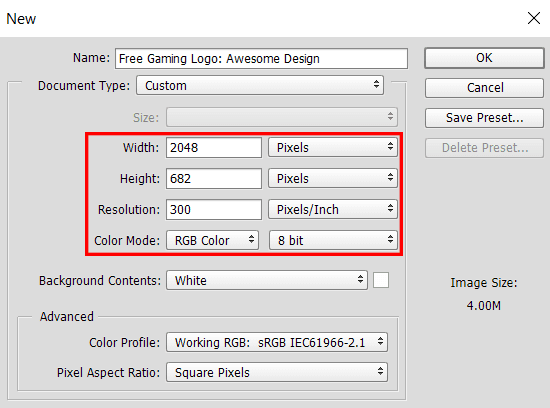
If you're used to designing, you'll know you need to set the canvas size whenever you create a new file. For this method to work, you should set the canvas size to the optimal dimension you've calculated in step 1, that is with the longer side in 2048 px. However, if you're doing the design for some specific needs which require you to use larger resolution, it's still fine for you to adopt a larger than optimal dimension. It's because you can still export the image in the optimal dimension even if you use a larger dimension at first, which we'll cover in later steps. The key is that if you're opting to achieve the best quality, you should not use dimension that is smaller than the optimal one you've calculated. Assuming you're Photoshop, you can make the settings like the following when you create a new file:
- Make the image size to optimal dimension or larger
- In 300 pixels/inch (PPI)
- In RGB 8 bit mode
3. Use high definition / resolution graphic elements in your design
This is probably a common sense, but notably many designers have committed such a mistake. It is fairly common for designers, especially social media designers, to use some stock image and effect graphic elements obtained either from the Internet or from graphic packs. While most of the stock elements are of quite high resolution, there are some which are not as HD as the others. Never scale up raster graphic elements (unless they are vectors which are scalable without any quality loss!) beyond their original resolution to prevent any artifacts and blurriness afterwards. You can't expect an overall HD design while the elements you use aren't that HD. If your own eyes aren't that trusted, try giving your finished design to somebody else for some opinions. Others may spot the blurriness or obscurity more easily than your own eyes.
4. Group all the layers and set the opacity to 99%
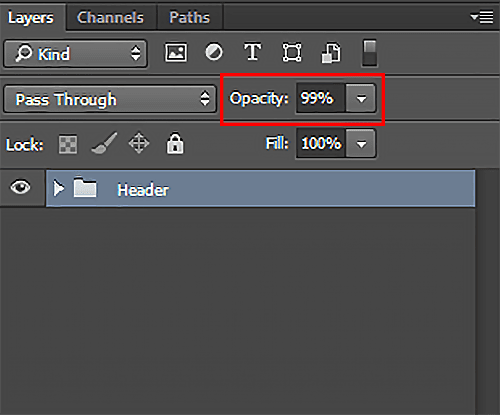
This step is important to force Twitter to recognize the PNG file format. After you finish your design like a header or channel art, group ALL the layers and set the opacity of the group to 99%. If you're going to upload an image with just one layer (e.g. a photo you've taken), just set the opacity of the single image layer to 99%. Make sure there is no background layer underneath. For this method to work, make sure you have only either a GROUP or a SINGLE LAYER with 99% opacity, in the layer panel. The rationale is that Twitter's image uploader will realize that transparency is actually not needed in a 100% opacity PNG so it'll convert it to a JPG with heavier compression which is much more blurry. A 99% opacity PNG does not dramatically affect the overall colors and effects of your design, but can send a signal to the Twitter image uploader that transparency is important, and only a PNG can retain transparency but not a JPG.
NOTE:
If you're patient and meticulous enough, and think that the 99% opacity is totally unacceptable and ruins the color, saturation and effects of your design, you can also merge all the layers and delete ONE pixel (e.g. at the corner) from the final outcome so that there is a transparent pixel (you MUST use a transparent background) for Twitter to recognize the PNG. We do not suggest this method as it needs more meticulous mind and lots of zooming in to do so, and we don't guarantee it works every time. There is also an online tool from RavenWorks or totoraj930 (blue button to select and grey button to save) which can achieve a similar outcome.
5. Save for web as transparent PNG-24 in optimal dimension
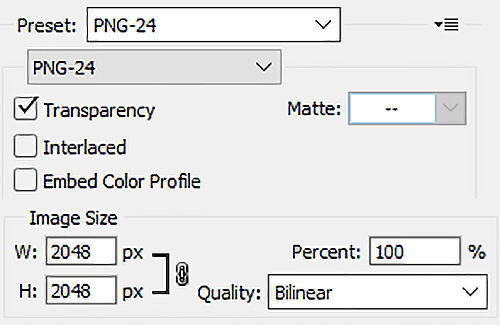
Exporting in the right way is as crucial as the previous steps. We'll suggest using "Save For Web" or the newer "Export As..." to save the PNG in Photoshop. Either way, you'll need to choose PNG-24 (Save For Web) or PNG (Export As...) as the exported file format. Transparency is definitely needed to force Twitter to recognize the image as a PNG. As Twitter will ultimately scale down any larger PNG to an optimal dimension (longer side in 2048 px), it's wiser to export it in optimal dimension (as calculated before) at first to avoid any upload problems. The quality mode to export PNG does not affect much about the upload quality. So, to summarize:
- Choose the file format as a PNG-24
- Make sure "Transparency" is checked
- Image size dimension is optimal as calculated in step 1, that is the longer side in 2048 px
- Quality mode set to bilinear. Others are fine too.
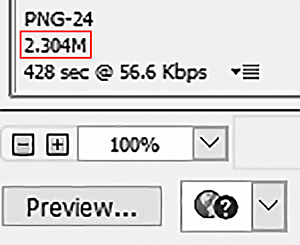
6. Exported PNG file size must be under 2.5 MB
This important tip takes us quite a while to discover, and it's quite a troublesome setback that's hard to solve. You need to ensure that the exported PNG file size needs to be under 2.5 MB, otherwise Twitter may force it to be converted to JPG with heavy compression, or it may cause "internal server error" when uploaded. 2.5 MB is not a magic number, but should be a safety margin, or regarded as the upper limit of the uploaded PNG image. In our experiments, PNGs with file size way beyond 2.5 MB absolutely do not work, while some of those with just a bit above 2.5 MB might or might not work, and a majority of those below 2.5 MB work perfectly. If your PNG file size is too large, or have already tried one with <2.5 MB but failed, you may need to reduce the file size. There are several ways that you can reduce the file size, but all these affect the quality of your design. You have to make compromises.
- Export in a dimension smaller than the optimal dimension
- Reduce the effects or graphic elements used in your design (though we don't suggest this)
Assuming you're using Photoshop, you can actually estimate the PNG file size in the Save For Web or Export As... window, before you actually save it.
7. Test and verify with another Twitter account
This step is for anyone who wants to be 100% sure the PNG will work and won't screw up after being uploaded to your Twitter timeline. Prepare a dummy Twitter account (usually with protected tweets). Upload the exported PNG to the Twitter timeline. Afterwards, you can click on the image to see a larger preview. Right click the large image to "Save image as...". If it is showing the file format as a PNG or sometimes PNG-LARGE depending on the browsers you're using, then it works perfectly. If it doesn't work, review the procedure carefully to see if you have missed anything. Feel free to ask us about it on Twitter if you need any help with the process.

SHARE YOUR THOUGHTS
Have you tried our method to upload high quality and high resolution images, photos, pictures or designs in PNG to avoid the heavy JPG compression? Does it work? Do you have any particular observations or tips as well? Feel free to share your thoughts. Let's share this to the design community so we'll no longer see any complaints on Twitter image upload quality and can enjoy much better and clearer graphics!
Subscribe to:
Posts
(
Atom
)


